Thirukarthigai Deepam is on 6th December 2022 click here for recipes

Search Recipes in Sara's Corner

Showing posts with label How to make. Show all posts

Friday, May 24, 2013

Karuvepilai Podi | Curry Leaves Powder | How to make!

Its difficult to blog after post natal, taking care of both the babies is quite interesting and busy. since Amma and Appa is here to help me, I am posting quite a few recipes.

This is a post for Non Karuvepilai/curry leaves lovers.
Curry leaves is very healthy and rich in Iron. This also gives good aroma to the dish.

Most of the people/kids throw if found in food. Sometimes it gets spoilt keeping in fridge for long time. You can make large batches and reserve few. Making these still has the natural aroma and is flavourful.

Today,I had posted a question on my Facebook page check it out here. Thanks to my friends found interesting answers.

So here is a simple solution for this.


Method

Take Bunches of karuvepillai/curry leaves sprigs.

Wash curry leaves sprigs and pat dry it.

Spread them on a white cotton cloth or news paper.

Keep it in sun or under shade until all water is dried.

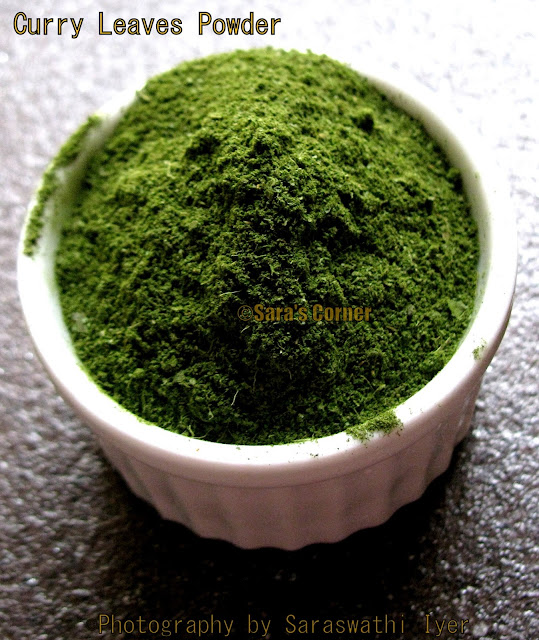
If its under good sun, remove stem and grind the leaves to fine powder in mixie.

In abroad if you cant put under sun, wipe them remove leaves dry roast the leaves in a kadai. Cool it and grind to fine powder.


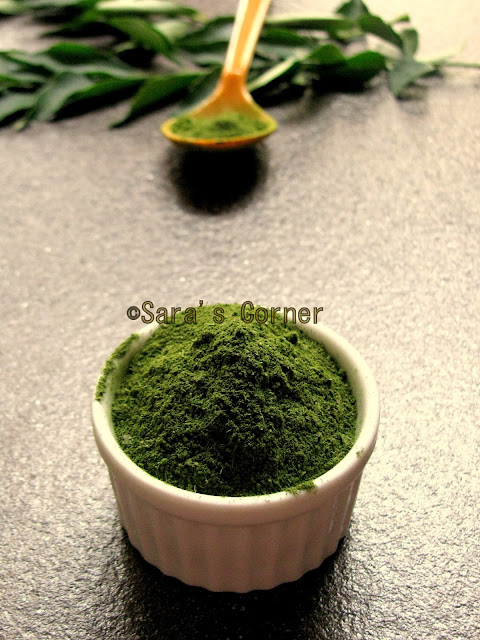
Store in air tight container and use it in your cooking.

PS - You can reserve some fresh leaves.

We can feed Curry leaves to our kids :)

Checkout Recipe for Spicy Curry Leaves Powder here.

Friday, May 25, 2012

Homemade Fresh Chena | Soft Paneer | Step Wise Basic Recipe!

Thank you for the wishes on FB for my Engagement Anniversary. I have done this many times at home, but today was able to click the step wise pictures. Hope you like it.

How to make Fresh Chena/Paneer at home step wise pictures. I have already posted the recipe here but this has a slight change in preparation and just loved this. This recipe is exclusive for sweets.

Ingredients
Amul Gold Extra Cream Milk - 1 ltr
Vinegar - 1 tablespoon
Muslin cloth or any white dhothi cloth.

Preparation Method

Step by Step pictures


I have used Amul but you can also use any Full Cream Milk.

Boil Milk


Add Vinegar to the milk


Get ready to collect chena

Just started to curdle.
curdling.

Fully Curdled
Pour and collect. Check out it will be real hot.

Hang for whey water to drop out.

1. In a vessel add milk and allow to boil. Once it come to boil, add vinegar and after 1 min off the stove. Mix it with a spoon/laddle.
2. Let it sit for few minutes and mix until all the milk is curdled.
3. Take a vessel put cloth on it and pour this slowly.
4. Collect the panner and tight it thoroughly to a tap or anyplace so all water is dropped for about an hour or more.
5. Then squeeze extra water and transfer it to a bowl or air tight container for use of any preparation of Bengali Sweets at home.

You can also keep a heavy vessel or pressure cooker on it and flatten it. Once the water is gone. You can cut into squares for gravies. 


This is unsweetned Chena for the sweets.

My future post is definitely a sweet dish. Any guesses? leave your comment.

PS - Your feedback is appreciated. Do try recipe from (http://www.sarascorner.net/) take picture and send it to me through Facebook message or mail me at simplysara07@gmail.com. Will be glad to add in my page Tried & Tasted album on FB or post on my page.

Monday, April 9, 2012

Thakalli Thokku | Tomato Pickle!

Thakalli Thokku | Tomato Pickle is very tangy and tasty recipe. This is a traditional dish taught by my Mother-in-law who makes this to her perfection,  as in Bangalore we used to do Gojjus. It was new to me and I loved it a lot. Its also my family favourite sidedish. A good timesaver and accompany many dishes. I always prepare and store it in my place, when I find really red tomatoes in Little India cannot miss it.


Ingredients
Fresh Red Tomatoes - 10 nos
Turmeric powder - 1/2 tspn
Red chilli powder - 1 tablespoon(As per your taste adjust)
Fenugreek seed powder - 1/2 tspn
Cooking Oil - 1/2 cup (I use gingely oil or olive oil)
Mustard - a pinch
Hing/Asafotida - 1/4 tspn
Salt

Preparation Method
Wash, cut and chop all the tomatoes into 4 pieces and keep aside.
Heat a heavy big kadai/wok, add oil, a pinch of mustard and hing.
Once mustard pops, add the tomatoes and mix.
Leave it for 5 mins. Then add, turmeric powder, red chilli powder, salt and mix.
Close it with lid, as it will pop out while boiling and cook till the tomatoes are soft.
It will be too soft  and watery. Continue to close lid.
The colour will change from light red to dark red.
When its going thick add venthaya podi/fenugreek powder. Mix and check for salt and spice levels.
if you wish you can add. Usually, adding the spice and salt little more is better, when it cools, it will be to correct level. Do not cook for long after adding venthaya podi, this will make bitter.

When the gravy is thick and oil leav es the side and good aroma. The dish is ready. Allow it to cool.

Store in clean glass or plastic bottle.  This can be sidedish for kootu rice, curd ricechapathi, Idlis, Dosas and Adai .

Methods of using tomatoes in thokku. You can use any method.

1. Just chop them and cook
2. Remove seeds and cook.
3. Remove seeds, skin, grind to fine paste and cook.

Notes - This can be stored upto 15days in fridge.
Do not put stainless steel spoon and store, try to put wooden spoon.

How to prepare fenugreek powder at home.
Fenugreek powder /Venthaya podi - Take 1 cup or required amount of seeds dry roast in a kadai in medium flame to slightly brown. Allow it to cool and grind it to a fine powder. Store in air tight container for later use.

This recipe is going to Kalyani's Event Pickles and Preserve Fest and Spring Seasonal Food Event by Sravani.

Thursday, March 22, 2012

Homemade Italian Basic Sauce!

I have been wanting to post this recipe from long time,  thought of posting this today as I prepared. I love Italian dishes.

I used to use store bought sauce and this is the first time I tried at home. It was perfect and yummy. This sauce can be used for Pizzas /Pastas /as a dip.


Ingredients
Tomatoes - 2 nos
Garlic - crushed /chopped 2 to 3 nos
Basil leaves - few
Tomato sauce - 1/2 tspn
Olive oil - 1 tspn

Preparation Method
Blanch the tomatoes(see notes below)
Heat wok/pan, add olive oil, add garlic just toss for few mins(it should not be brown)
Add the tomato puree, tomato sauce, chopped basil leaves and cook the gravy till raw smell goes. You will get a thick sauce.

Italian Basic Sauce is ready for use in your dishes.

Allow it to cool and store in air tight container.
Notes - Blanch - Boil enough water in a vessel, put the tomotoes and cover it for few mins. Then put in cold water, remove skin slowly. Cut into four pieces and deseed it. Put in a blender/mixie and grind to fine paste.

Thursday, October 13, 2011

How to make Papdi for Chaat?

Papdi is very popular in North India. I have been wanting to try, this time when my sister in law was here, we tried and it was very tasty. Its used in chaat. My son loved it as it is.


Ingredients
Maida/APF - 2 cups
Butter - 2 tspns(at room temperature)
Omam/Ajwain- 1 tspn
Salt
Water as required
Oil for deep frying


Preparation Method
Mix all the ingredients and make a dough(like chapathi dough)
Roll a big chapathi evenly using an rolling pin and take a round cookie cutter or cover of any bottle and cut.
Prick it by fork.
Deep fry both sides.

Repeat the same process with the rest of the dough.

Papdi can be had as it is or in chaat.

Store it in air tight container for later use. It will be good for about 1 week. This can be used in Masala Puri a popular Street food chaat in Karnataka.

Friday, October 7, 2011

Homemade Oma Podi /Sev | Step-by-Step Diwali Recipe!!!

Oma Podi / Sev is a simple and tasty fried savory. It tastes great as it is and widely used in chaats and mixture. Its aromatic with Omam/Ajwain/Bishop weed. This is popular in all sweet and savory shops in India. This is my kids and in-laws favourite as its not spicy.

This recipe is taught by my in-laws.

Step-by-Step Photos


Testing the flow


Recipe
Ingredients
Kadalai Maavu/Besan/Chickpea Flour - 4 cups
Rice flour - 1 tablespoon
Omam/Ajwain/Bishop Weed - 2 tspns
Salt as required
Oil for deep frying

Preparation Method
Soak Omam in water for 1 hour and then boil it with water to get Omam water. Allow it to cool. This is for mixing the dough.
Then filter the water and keep.
In a wide vessel, put kadalai maavu, salt and mix with omam water as required to a soft dough. Make equal portions of the dough.(1tablespoon rice flour to get crispy)
Heat oil in a kadai/wok, take a small portion of the dough, put in murukku/omapodi nazhi/hand press gadget.
Press in the hot oil fully in a circle wide.
Let it cook, turn around and deep fry.
Take it on a tissue paper and just press by hand and make small pieces.


Homemade Oma Podi is ready. I love this with sambar rice and rasam rice.


Notes :
- Do not put the whole omam as it will block the holes of the murukku nazhi/ gadget.
- Use the fine and small hole sevva nazhi.
- Adding Rice flour(optional), it will be crispy.

Thursday, July 7, 2011

Curry Podi/Powder!!!

As one of my blog reader has asked me for the recipes of podis. Am sharing the recipes.

Curry Podi/Powder is a very handy homemade masala powder. This can be used for any vegetable curry's. Its very flavourful. I make in small quantities and use it. This recipe is from my mother in law.

Ingredients
Dhaniya/Coriander seeds - 1 cup
Kadala Paruppu /Channa Dal- 1/2 cup
Dry Red Chilli - 1/2 cup or 10nos(As per your spice level increase or decrease)
Peringayam/Asafotida -  a small piece or 1/4tspn

Preparation Method
Dry roast all the ingredients one by one with a 1/2 tspn oil till its slightly brown.
Cool and grind it to a coarse powder.

Store it in an air tight container and for later use.

Notes - You can dry roast without oil for long use and if you are preparing in large quantity.

This multipurpose podi can be used in rice, sundal and curries. 
Check my recipes using this here. 

Saturday, March 13, 2010

How to make Sprouts?

Sprouts can be prepared from any pulse/legume. Its very healthy if consumed raw without cooking. I prepare sundal with this. Its good to reduce weight and cholestrol.

Heres the simple steps to make the pulses/legumes sprout.

Take 1 cup of green gram or as required.


Soak it in water till its nicely soft.


Its looking soft.

Then remove water and cover it with a lid or put in an air tight container.

Leave for a day or two. It will be perfectly sprouted.


Repeating the steps together
Take 1 cup of green gram or as required.
Soak it in water till its nicely soft.(atleast for 6-8 hours)
To know this you take one or two green gram press and see it should break.
Then remove water and cover it with a lid or put in an air tight container.
Leave for a day or two. It will be perfectly sprouted.
You can have it raw or make a salad with it.
Can also keep in refridgerator and use.

(I usually soak it in the morning by evening remove water and keep checking till next day it should be ready)

Click on the image for Green Gram and Pomo Salad recipe.

Read more on my previous how to make posts click here.

Tuesday, August 4, 2009

Mizhagu Rasam Podi(Powder) -1

Rasam is famous in South India. Heres recipe for the podi which is very handy if stored.

Everytime I think of posting the recipe of the podi somehow missing it. So today when I made the podi thought definitely I should post it.

This can be used to prepare Mizhagu Rasam. Can also add little of this for flavour to other Dal rasams. if you like... This podi is different from usual mizhagu jeeragam podi which we use in Mizhagu/Pepper Rasam.


Ingredients

Mizhagu (Black Pepper) - 2 tspns

Jeeragam (Cumin seeds) - 3 tspns

Thavaram Paruppu (Toor Dal) - 3 tspns

Dry Red chilli - 4 nos (Optional)

Method

Dry Roast for sometime all in a Kadai without oil and grind in mixie to fine powder when its cool.

Note -
- This can be prepared in large quantities and stored in air tight container. I prepare for about 15days and store.

- You can change measurements of ingredients, if you like spicy can add more black pepper and drop out dry red chilli.

Wednesday, July 8, 2009

Masala Dosa with Batter recipe!

Dosa (Lenthil and Rice Crepes) is very famous Breakfast/tiffin in South India. Its popular not only among Indians but also liked by many foreigners too... When I was in Panama this was one of the favourite of Panamanians they love to eat Indian food... This is my favourite too and I love making dosas.....

Ingredients
Dosa Rice or Boiled Rice - 3 cups
Urad Dal - 1 cup
Bengal Gram(Channa Dal) - 1/4 cup
Toor dal - 1/4 cup
Rice flakes(Aval/Poha) - 2 tblspns
Fenugreek seeds(Venthayam/Methi seeds) - 1/2 tspn

Preparation Method
Wash and soak the above ingredients for about 5-6 hours in water and then grind to a fine paste.
Dosa Batter (Dosa Maav) has to be fermented for overnite or for about 4-5 hours.
While grinding do not add more water. Consistency should not be very thick and not very thin. It should be medium so its easy to spread on skillet(tawa/dosa kal)
Then Heat a pan either non stick or normal one.
Heat the pan in medium or low flame and spread batter slowly thick and thin. Put one tspn oil and close with a lid.
Check whether its well cooked thats it will be brown and crisp on the thin spread and dull white on think spread.

Masala dosa is always cooked one side (sometimes I slightly cook on the other side) Reduce flame. Place Aloo masala in the centre and close the dosa. (checkout the photos below)
You can even spread onion, garlic and red chilli chutney and put aloo masala.


Masala Dosa is ready to serve. It can be served with Coconut chtney / Sambar.

This Masala Dosa recipe is going for Dosa Corner Event hosted by Padma's Recipes and Show me your Breakfast by Divya Vikram.

Tips -
Heat the pan always in medium or low flame spread batter and then increase flame.
You can rub the pan with sliced onion.
Always make first dosa very small and then later dosas can be made big. Sometimes batter will stick.
When kept in fridge, keep the batter outside about 1/2 hour before making dosas, If the batter is chill then also you cannot spread the batter easily.
If you do not have so much time in grinding batter at home you can also buy ready to make wet dosa batter which is easily available in super markets.

Monday, June 22, 2009

How to make Paneer at home?

Its been a week since my last post, my target is 2 posts a day. But with my son keeping me busy trying to keep it to 1 post a day. This is in my drafts since a month so posting it today.
Paneer - Indian Cottage cheese is favourite for most of them. I know its more of fat but..... I dont miss to order any paneer dish in restuarants as its my favourite too:-)This is used mostly in Northern India. Now a days most of the kids love too.

Heres you go with how you make paneer at home.

Ingredients

Full cream milk - 1 litre
Vinegar - 2 tspns
Muslin White cloth

Preparation Method

Boil milk on stove.

When its finally forming cream put vinegar and allow it to boil for 1min. So that full milk to curdled. off the stove.

Now in a muslin cloth pour and filter it slowly. Be careful its too hot.

Then remove full water and keep a heavy vessel or any weight on it to remove excess water for about 3-4 hours.

Then remove and store it in freezer. Later you can cut in cubes or grate it whenever needed.

See step by step procedure.

Boil milk as usual.


Then add vinegar to curdle the milk. Stir well so all milk is curdled.
Then strain it in muslin or white cloth and squeeze fully and remove water. (I forgot to take the snap)
Keep a heavy weight on it so no water is left out.

Now after setting for about 4 hours it looks like this. You can cut paneer and store in freezer or directly start cooking by frying it in ghee or oil.

Paneer is ready to use. This can be used for Bengali sweets or gravy.
Notes: You can use little lemon juice too for curdling but vinegar is better. Sometimes paneer is of lemon flavour.

Headlines

Sara's Corner
Blog Widget by LinkWithin
d

Click here

Click here
Join
Top Food Blogs
Top Food Blogs

Join Sara's Corner at

Infolinks 2012
Sara's Corner reserves copyright of this blog. Do not copy or use information, text, images without permission of the owner.

google.com, pub-7557486609431298, DIRECT, f08c47fec0942fa0
SARA'S CORNER Copyright © 2009 Blogger Template Designed by Bie Blogger Template